Over the past few years my son has shown interest in switching from console to PC Gaming. He likes the potential performance increase and upgradability of PC gaming.
As a techie, I like the idea of learning new skills, troubleshooting and putting systems together by hand.
With that said, we saved a few nickels and put together a plan to build a Gaming PC on a budget.
One of the biggest challenges with building a gaming PC as of 2022 has been the scarcity of parts and high cost for acquiring those parts. Demand for computer parts has risen due to an increase in crypto mining, supply chain constraints, and increase in scalpers over the past few years. With that in mind, we’ve opted to build a PC without a Graphics Card, that is still able to play the popular games my son enjoys. Namely, Fortnite.
We were in luck. The Toasty Bros published a video titled “$500 Budget Gaming PC Build Guide 2022”
The video played the path for us to build a PC with parts readily available, affordable, suitable for the gaming we had in mind.
And when I say we, its pretty much my son. Since I dont know how to Fortnite and have never “PC Gamed” before.
Our parts list is as follows (some of these links may be affiliate links which may earn me a commission at no cost to you):
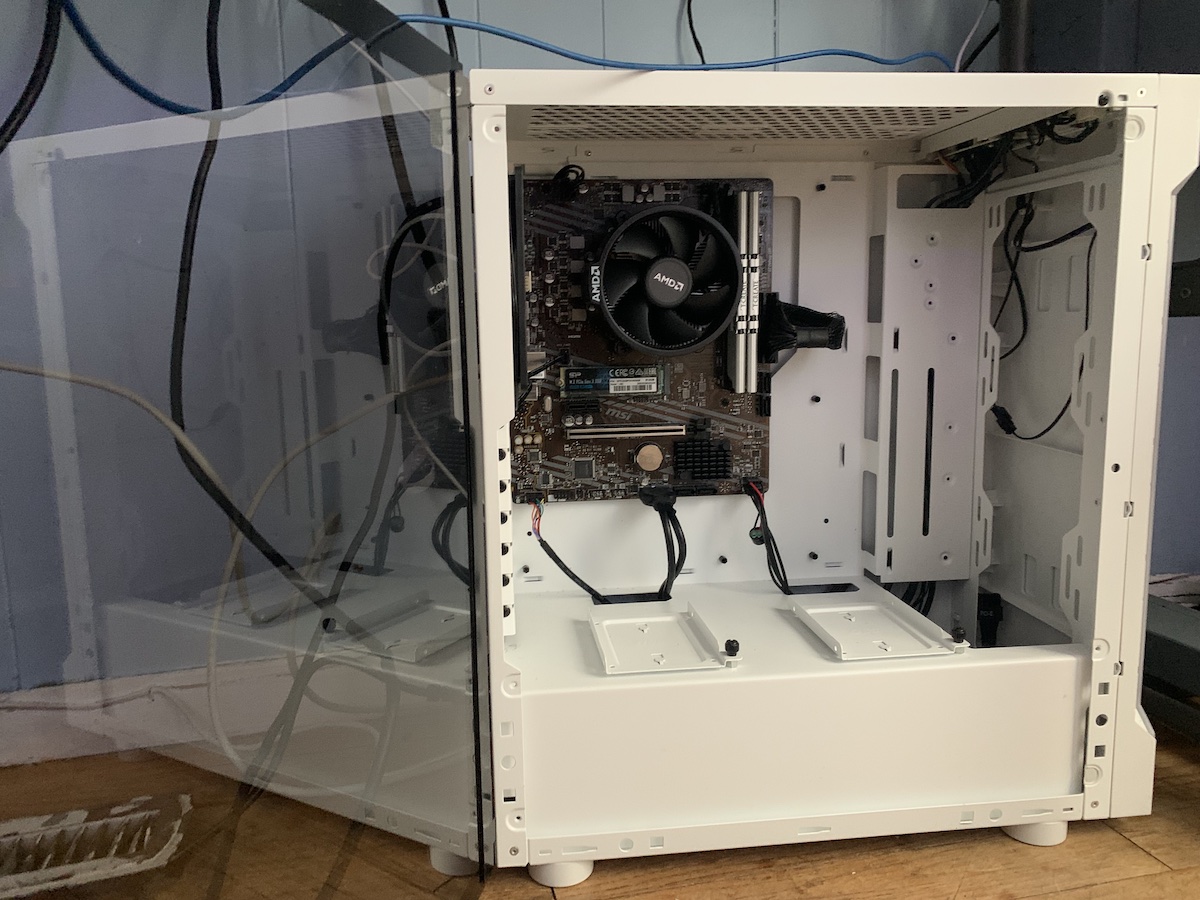
Ryzen 5600G – AMD Ryzen 5 5600G 6-Core 12-Thread Unlocked Desktop Processor with Radeon Graphics. We chose this because it was available, it was affordable, and its an integrated graphics card suitable for playing some of the modern titles we like. In addition, the brand new CPU comes bundled with a fan (AMD Wraith Stealth Cooler – no LED).
We like this because the CPU has integrated graphics enabling us to play games without needing a graphics card. Once prices stabilize, we can upgrade the build.
Next was the motherboard. We went with the Toasty Bros recommendation of the MSI B550M-A Pro board.
This is a good base board because it helped us maintain our budget, while providing lots of features. We like the M.2 drive capability, DDR4 support, several SATA connections, and has HDMI connectivity.
What we didn’t like about this board is it doesn’t include WiFi or a flash bios button – which would enable us to update the bios without a compatible CPU.

The board was manufactured before the availability of our chip – the Ryzen 5600G with integrated graphics – so when we completed our build, our CPU was unable to display anything to our monitor.
This board required us to have 3rd Gen Ryzen CPU available so we can use the display, update the Bios to support our Ryzen 5600G, and then use the latest CPU.
As an alternative, I recommend getting a motherboard that includes a Flash Bios Button – so you can update your board without a CPU (because if this is your first CPU build, you likely dont have a spare CPU laying around.
The way we overcame that problem is by asking the fine folks over at CTek, in Waterbury, Connecticut, to help us across the finish line. You can check out my experience with their great work on this CTek shop review.

Another recommendation is to procure a motherboard that includes WiFi, especially if you don’t have an ethernet connection readily available.
Our 60+ year old home did not have an ethernet connection on our floor (router on the main floor, computer on the second floor).
To overcome this we used a TP-Link AV2000 Powerline Adapter. This option allowed us to connect a poweline adapter from the Outlet, to the router, and then the other adapter connects to the outlet near the computer, and then we run a LAN cable from the adapter to the computer.
This helped us connect to the computer, but if we had WiFi as an option, we wouldn’t necessarily need this as an option. Of course, this depends on your own connectivity speeds (wifi vs. poweline LAN) and suitability for your gaming needs.
An alternative board similarly priced is the MSI B550M PRO-VDH, which has WiFi, and Flash Bios. As an added benefit, it also has DisplayPort vs. DVI and HDMI (like the B550M-A board).
For RAM we used the TeamGroup T-Create 16GB 3200Mhz
We upgraded the storage from the recommended 256GB M.2, to 512. We used the TeamGroup MP33 512GB NVMe.
Next up was the power unit. We referenced the pcpartpicker.com website and double-checked the power consumption needs of our build, along with potential graphic cards we’d add in the future. Our current build estimate is under 150 watts. If we maxed out with a 3090 card (huge power consumption) we’d be at 500W. A more realistic card like a 3060 card for this set up would put us at around 350W. When we add an SSD for extra storage we’d still be in that ball park. For this reason, we went with a 500W Power Supply unit.
And for the case we used the Thermalake Versa H18 Glass in white. They call it ‘Snow’ – but its white.
This set up comprises the actual PC, but since we were basically starting from scratch, we needed a few other components.
We paired the PC with a 144Hz gaming monitor. We went with the ASUS VP249QGR 23.8” Gaming Monitor, which comes with HDMI and DisplayPort as connection options. Our intention is to use HDMI for now, and add DisplayPort when we add a graphics card.
ASUS VP249QGR 23.8 Gaming Monitor 144Hz Full HD (1920 x 1080) IPS 1ms FreeSync ELMB Eye Care DisplayPort HDMI VGA
As mentioned before, we added an ethernet connection solution by adding the TP-Link AV2000 Powerline Adapter.
The adapters came with some Ethernet Cables, but we wanted a few colorful cables so we picked up a pack of colorful cables to go with our build.
My son wanted a mechanical gaming keyboard, and purchased the RK ROYAL KLUDGE RK61 keyboard.
All of our computers at home are Apple, so we were unable to re-use a previous product (if you’re merely updating your previous system, you may be able to re-use your system’s key).
We purchased Windows 10 and the corresponding product key from Microsoft.
Future plans:
- Run an ethernet switch with cables to each room that uses LAN. For example, bedroom Smart TVs, Gaming PC, Home Office, etc. But until then,
- Add a WiFI PCIe and bluetooth card like the TP-Link AC1200 OCIe WiFi Card https://amzn.to/3vHbcrI
If using this build as a guide, I recommend supplementing your build with the Full manual vs. the Quickstart manual located on the website
Also, think ahead about actions needed AFTER the build. I watched JayzTwoCents video titled “Guide: What to do AFTER building your computer…”
A few notes:
If your motherboard doesn’t support your CPU out of the box, plan to use another CPU that is supported to update the Bios. You can always return the CPU (subject to the company’s return policy). Or
Get a motherboard that has Flash Bios capability so you can update the bios without a CPU
Get a Windows Install media and a license product key
Install Windows
Boot from your windows install media TO your brand new drive (more detailed info on the video linked above)
Setup WIndows
- Basic drivers will be installed automatically
Windows Update
- Connect to the internet
- Windows will install and update drivers to more current versions
Driver Installation
- Update drivers by going to the manufacturer site
- Add a clean install to the graphics card (if applicable; our build above does not have a graphics card)
Final Setup
- Increase the panel refresh rate
- Consider Increasing RAM speed to its capacity
- Download the latest drivers for your motherboard features such as your chipset, ethernet, sound card, RGB and software associated with any of those features
What tips or suggestions do YOU have? Comment below and share the knowledge
Complete Amazon Titles
- Ryzen 5600G – AMD Ryzen 5 5600G 6-Core 12-Thread Unlocked Desktop Processor with Radeon Graphics
- MSI B550M-A Pro – MSI B550M-A PRO ProSeries Motherboard (Support 3rd Gen AMD Ryzen, AM4, DDR4, PCIe 4.0, SATA 6Gb/s, M.2, USB 3.2 Gen 1, DVI/HDMI, Micro-ATX)
- Alternate recommendation- MSI B550M PRO-VDH WiFi ProSeries Motherboard (AMD AM4, DDR4, PCIe 4.0, SATA 6Gb/s, M.2, USB 3.2 Gen 1, Wi-Fi, D-SUB/HDMI/DP, Micro-ATX)
- TeamGroup T-Create 16GB 3200Mhz – TEAMGROUP T-Create Classic 10L DDR4 16GB Kit (2 x 8GB) 3200MHz (PC4 25600) CL22 Desktop Memory Module Ram – TTCCD416G3200HC22DC01
- TeamGroup MP33 512GB NVMe – Silicon Power 512GB NVMe M.2 PCIe Gen3x4 2280 SSD (SP512GBP34A60M28)
- Aresgame 500W 80+ Bronze – Power Supply 500W 80 Plus Bronze Certified PSU (ARESGAME, AGV500)
- Thermaltake Versa H18 Glass – Thermaltake H200 Tempered Glass Snow Edition RGB Light Strip ATX Mid Tower Case with One 120mm Rear Fan Pre-Installed CA-1M3-00M6WN-03
- ASUS VP249QGR 23.8” Gaming Monitor 144Hz Full HD (1920 x 1080) IPS 1ms FreeSync ELMB Eye Care DisplayPort HDMI VGA
- TP-Link AV2000 Powerline Adapter – 2 Gigabit Ports, Ethernet Over Power, Plug&Play, Power Saving, 2×2 MIMO, Noise Filtering, Extra Power Socket for other Devices, Ideal for Gaming (TL-PA9020P KIT)
- Cable Matters 5-Color Combo Snagless Short Cat 6 Ethernet Cable 5 ft (Cat 6 Cable, Cat6 Cable, Internet Cable, Network Cable)
- RK ROYAL KLUDGE RK61 Wired 60% Mechanical Gaming Keyboard RGB Backlit Ultra-Compact Hot-Swappable Blue Switch White
- Future plans:
- TP-Link AC1200 PCIe WiFi Card for PC (Archer T5E) – Bluetooth 4.2, Dual Band Wireless Network Card (2.4Ghz and 5Ghz) for Gaming, Streaming, Supports Windows 10, 8.1, 8, 7 (32/64-bit)
